Tools - Backup
You can create and restore a backup of a project using the tools. This allows you to make a backup of all or part of the presence at certain intervals and store it locally. This is particularly recommended if changes are made frequently and no backups are kept by the provider itself (or as a supplement to the provider backups).
After creating a backup, alwayscheck whether the created backup (TGZ or ZIP) has been packed correctly. To do this, download the respective backup by clicking on the floppy disk symbol and check the archive. If there are problems reading/opening the archive, the backup could not be created successfully. This is usually due to insufficient storage space under the domain or other web server problems.

Click on the"Backup" button to open the tool in a new window.

Operation
'Backup':
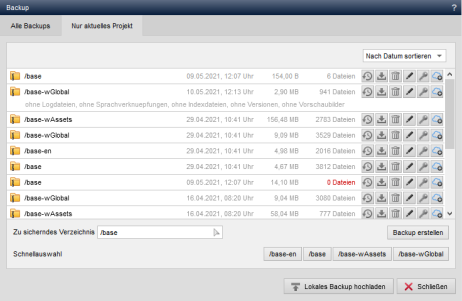
The window lists the backups already created with the exact directory path to the licensed domain, the date and time of the backup and the size and number of files contained in the backup file.
If"0 files" is displayed for the files contained, it can be assumed that the backup archive is damaged and therefore cannot be used for a restore! This may be the case, for example, if a backup process was not completed in full due to a lack of script runtime/performance or insufficient web space. A file size display of"0 B" can also indicate that the archive has more than 2 GB, which can lead to incorrect display of archive properties under PHP.
Please refer to the article ("Tips ...") in the further links at the end of the article.
'Restore backup':
By clicking on the restore icon, you can restore the corresponding backup after consultation.
Please note:
- Existing files with the same name will be overwritten!
- Directories and files that are present in the project to be restored but do not exist in the backup will be deleted when the backup is restored!
'Download backup':
By clicking on the save symbol, you can call up the corresponding backup for downloading/saving. In this way, the backup stored on the web server is also saved locally. This is recommended, as the backup is then still available locally in the event of a web server crash.
Backups should be deleted online after local backup in order to save the domain's storage space!
'Delete backup':
By clicking on the delete icon, you can delete the corresponding backup after confirmation.
'Edit/comment backup':
By clicking on the edit icon, you can enter a comment for the backup, which will be set as a note text below the backup path after it has been entered. This enables a more precise description of what kind of backup it is and thus helps to differentiate the backups (e.g.: backup before Weblic installation).
'Copy backup to cloud':
Click on the cloud icon to copy the relevant backup archive to a subfolder(wProjectBackups) of your cloud directory. This enables an additional backup and also sharing the backup archive for downloading for another installation, for example.
If a backup has already been copied, the cloud icon appears with a red symbol, which enables deletion from the cloud.
'Set permissions':
By clicking on the key icon, you can adjust the permissions of the files and directories in the backup archive. This is useful if you have problems restoring backups.
'Directory to be backed up':
In this field, you can use the right selection arrow to select the directory from which a backup is to be created.
'Paths to exclude':
In this field, you can optionally enter the paths that are to be excluded from the backup. Multiple directories are separated by the pipe character |.
e.g.: e.g. test or test|/en/private
'Create backup':
Click on this button to create a backup of the selected directory. This process may take longer depending on the size of the directory to be backed up.
'Import local backup':
Clicking on this button opens a new window to restore a local backup. In the dialog window, you can select a locally stored backup by clicking on"Select file". Once a Weblication® CMS backup file has been selected, you can upload it to the backup directory by clicking on the"Upload" button. Depending on the file size, this may take some time.
Make sure that the file name of a Weblication® CMS backup file corresponds to the required syntax, e.g.:
3217919_backup_demoprojekt_2010_08_12_18_54.zip
backup_demoprojekt_2010_08_12_18_54.zip
'Quick selection':
When calling up the backup tool via the Weblication® panel, you will see a quick selection at the bottom window of the backup tool to conveniently create the associated project directories for the called project directly as a backup with a click.
This selection does not appear when calling up the backup tool via the backend.
On a server with a Unix/Linux operating system, you will generally achieve better backup performance if you set this to TAR (see further articles below)!
If the backup process does not run, this is usually caused by the PHP environment of the corresponding server (PHP script runtimes, memory, etc.) or the storage space of the hosting package (web space) is no longer sufficient. The system settings available in Weblication® may already help (see further links below). Otherwise, you either have the option of increasing the PHP performance in the existing hosting package or via a more powerful package, or you can create backups using the tools provided by the provider (control panel, shell, etc.).


