Image processing maintenance tag / WYSIWYG
To edit images in Weblication® CMS, different image editing maintenance screens are available depending on the project implementation.
The BASE project basis uses an "Image" structural element within page editing that offers a wide range of options for defining the image size, linking, mouseover, image section, etc. This element is described in the article "Image editing image element". This element is described in the article "Image editing image element".
The image maintenance tag, which is no longer used in the standard system (e.g. also in the BASE project basis), is described below. This image editing mask can be used optionally, e.g. for images integrated in WYSIWYG.
Please refer to the article below on the quality of web pages.
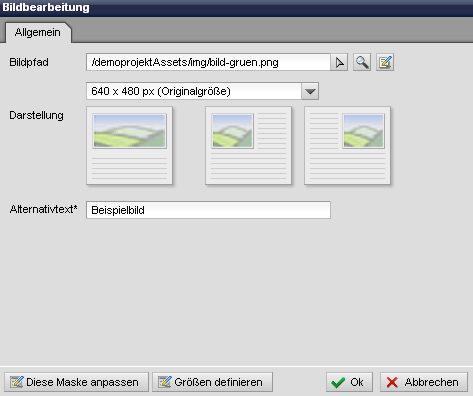
Within maintainable text areas (WYSIWYG field), you can edit images with regard to the image attributes (path, class, alternative text, etc.). Depending on the settings of the maintenance mask, you will receive the attributes released for maintenance in image editing. The default attributes are described below.

Operation
'General':
The 'General' tab displays the maintainable attributes that have been defined as maintainable via the corresponding maintenance screen for this tab (sheetRegister="common"). In addition, further tabs can optionally be displayed via the maintenance mask (Extended, Style, Language, Events).'Image path':
In this field, use the right selection arrowAs soon as a path is entered in the field, a magnifying glass symbol
If an editable image file is stored in the field, an edit symbol
'Image size (selection box)':
You can use the selection box to select the size in which the previously specified image is to be output. The values or size specifications available in the selection box can be freely defined by an administrator using the "Define sizes" button optionally visible at the bottom of the image editing mask.Make sure that you select a width that is suitable for the respective page so that the image does not protrude beyond the content, for example.
'Display':
By clicking on one of the display types (displayed as image), you can select the display of the image. By default, you are offered the following options, each of which is illustrated by an image:- Normal display
- Image aligned to the left
- Image aligned to the right
The display types available for selection can be adjusted manually in the project via the associated XML file.
'Alternative text*':
In this field you enter the alternative text for the image, which should describe the image in more detail.The alternative text is visible in many browsers when the mouse pointer is moved over the image and is particularly important for accessible websites.
If the title of the image is also to be maintained, this can also be set in the maintenance mask. The Mozilla browser, for example, uses the title attribute.


