Editing links
Convenient link editing is available for editing links (cross-references) in Weblication® CMS.
The two project bases BASE Classic and BASE (Mobile First) differ in the implementation of the link element (Weblic®).
The BASE Classic project uses a "Link" structural element within page editing, which can be used to edit the individual parameters of a link. This is based on the maintenance tag for links, which is defined via the maintenance mask for links.
The BASE (Mobile First) project also uses a "Link" structure element within page editing, which can be used to edit the individual parameters of a link. However, the underlying template does not use the maintenance tag for links, but is implemented via maintenance tags in such a way that the editing fields can be influenced via CSS-only.
You can also insert and edit links within maintainable text areas (WYSIWYG field). This is implemented in the same way in both BASE Classic and BASE (Mobile First). By default, the same maintenance screen is always used for link editing.
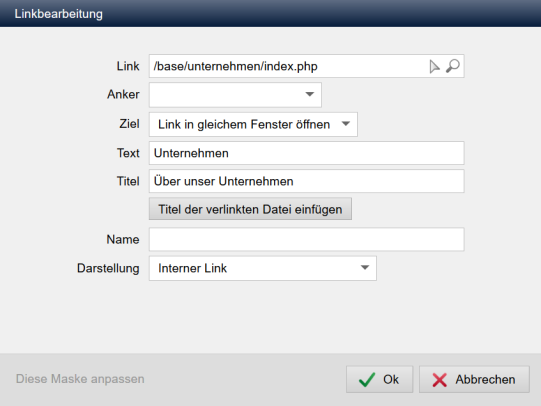
Depending on the settings of the maintenance screen, you will receive the attributes released for maintenance in link editing. The standard attributes for link editing shown on the left-hand screen are described below.

Operation
'General':
The 'General' tab displays the maintainable attributes that have been defined as maintainable via the corresponding maintenance screen for this tab (sheetRegister="common"). In addition, further tabs can optionally be displayed via the maintenance screen (Extended, Style, Language, Events).
'Link':
In this field, use the right selection arrowAs soon as an internal path (starting with /) is entered in the field, a magnifying glass symbol
'Anchor':
You can optionally select the anchors available for the selected project page via the selection box. When selected, the URL in the link field is automatically supplemented with this anchor name and thus represents a jump marker (e.g. /base/company/index.php#sitemap).This selection box only appears if a project-internal page containing an anchor has been selected via the link field. These can be links with a filled name attribute(see below) or containers with a corresponding id specification(e.g. Weblication® CMS headings (implementation of the Weblication® headings)).
'Target':
You can use the selection box to choose in which window or in which way the linked file should be opened. The following options are offered by default:- Open link in same window
The linked file is opened in the same window or browser tab in which the current page is opened. - Open link in new window
The linked file is opened in a new browser window or browser tab, depending on the browser settings. - Open link in popup (width x height)
The linked file is opened in a popup window. With this selection, two further input fields are displayed to the right of the selection box. Enter the width and height of the pop-up window in these fields (e.g. 720 x 560 for a width of 720 pixels and a height of 560 pixels). - Open link in a fancy box
The linked file is opened in a fancy box. With this selection, the selection box for the display is automatically set to Fancybox.
This selection is offered depending on the underlying BASE project basis. For older or individual projects, you must retrofit this yourself. - Open image in a fancybox
The linked file (image) is opened in a fancybox. With this selection, the selection box for the display is automatically set to Fancybox.
This selection is offered depending on the underlying BASE project basis. For older or individual projects, you must retrofit this yourself. - E-mail with SPAM protection
The e-mail address entered in the link field is provided with spam protection in the page output. This makes it more difficult for robots to find this e-mail address.
The display types available for selection can be adjusted manually in the project via the associated XML file.
'Text':
In this field, enter the link text that should be displayed for the linked file in the presence. This should also describe the link accordingly (e.g. directions).
'Title':
In this field, enter the alternative text for the link, which should describe the link in more detail.The title is displayed in many browsers when the mouse pointer is moved over the link and is particularly important for accessible websites.
By clicking on the"Insert title of linked file" button, you can optionally request the title of the linked file, which is entered in the field. This function only applies to linked HTML files from which the title can be read.
'Name':
In this field, you can optionally enter the name of the link that is to be assigned to the link. This is important for anchors or accessible pages, for example.This field only appears if the attribute is defined as editable via the link maintenance mask.
'Display':
You can use the selection box to choose which display type should be assigned to the link. In this way, a class is assigned to the link, which can be used to prefix the link with a display symbol, for example.The following options are offered as standard (demonstrated with the standard symbols):
- Standard link
- Internal link
- External link
- Next link
- Back link
- PDF FILE
- Download PDF
- video
- audio
- RSS FEED
- Fancybox
- Twitter
The display types available for selection can be adapted manually in the project via the associated XML file.


