Editing structural elements
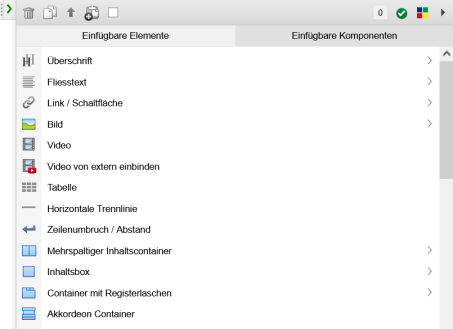
The structure editor offers you the option of editing the respective elements within page editing. A layer for selecting further elements and various functions is available for each element.

Page editing with the structure editor - Structure element (selection)
Operation
'Edit element':
Clicking on the arrow symbol ![]() opens a layer (submenu) with the available elements and the following options:
opens a layer (submenu) with the available elements and the following options:
- Delete

Click on this button to delete the current element within the page editing. The deletion process only takes effect within the page when the file is saved. - Duplicate (copy)

Click on this button to create a duplicate of the current element, which you can edit further. - Paste to clipboard
Click this button to paste the current element to the clipboard. The element can be inserted as an element in another page editor that is open at the same time. To do this, it is also necessary that the group of the element in the target file is identical. - Paste element from clipboard
- Icon if an element was previously pasted to the clipboard:

Click on this icon to paste an element from the clipboard at the current position. The pasted structural element is inserted before the currently selected element. - Icon if there is no element in the clipboard:

This icon indicates that no element can be pasted from the clipboard. - Multiple selection

If this checkbox is activated, you can copy, delete or paste all page elements selected in this way to the clipboard in one step.
Tip: When activated via an element, all other elements on the page are given a checkbox at the front, which can either be clicked on or activated/deactivated by holding down the CTRL key and moving the cursor over the checkbox at the same time.
The elements pasted to the clipboard can be inserted elsewhere on the same page or pasted to another page across pages.
This button only appears for users of the Administrator user type
The following functions are available on the right-hand side of the structure editor bar:
- Tasks / notes
Number of tasks or notes that are stored for the element. - Online status
Clicking on this symbol opens the editing of the time control for the element. - Weblics

Clicking on this button opens the Weblics® administration with the option of installing further Weblics® or reinstalling an already installed Weblic®. A new installation of a Weblics® corresponds to an update of a Weblics® when overwriting the existing templates.
This button only appears to a user type Administrator if this is activated via the"System settings - Editor". - Extended selection

You can use extended tools for the structure editor by clicking on the selection arrow on the right-hand side.
This selection only appears to a user of the Administrator user type.- Edit XSLT representation of the element
Clicking on this button opens the linked XSL stylesheet file for editing. This button only appears to a user type Administrator if this has been defined in the XSL stylesheet of the element(maintenance tag reference: Maintenance of structure elements). - Edit insertable elements
Clicking on this button opens the linked master template element file for editing. This button only appears to a user type Administrator if this has been defined in the XSL stylesheet of the element (maintenance tag reference: Maintenance of structureelements). - Show source text
Clicking on this button opens a new window with the source text of the current element (XML structure). - Create insertable element
Clicking on this button opens the screen for creating a new master template element. The current element is used as the basis.
Use the screen to enter the ID, name (DE and EN) and the symbol of the new element. You can then edit the new master template element directly. - Create insertable component
Click on this button to open the screen for creating a new component. The current element is used as the basis.
Use the screen to enter the ID, name (DE and EN) and the symbol of the new element. You can then edit the new component directly.
- Edit XSLT representation of the element
- List of available elements (heading, continuous text, etc.)
Click on one of the structural elements listed in the layer to insert the selected element in the current position.
The structural elements available within the current group via the master template are offered for selection.
A user type Aministrator is offered the additional Weblics® / structural elements available for installation via the Weblics® portal below the already installed structural elements in a grayed-out font color.


