

Form editor / contact form
Website visitors can send you messages by e-mail directly from the website using a contact form.
In Weblication® CMS, you can easily create and manage forms using the form editor / form generator. A ready-made example of a contact form is already available in the Weblics® portal. This inquiry form - also supplied in BASE - is already equipped with almost all possible form elements.
In conjunction with the structure editor (core add-on module), the form editor allows you to edit, move, insert and delete form elements.
Pleasenote the information below on the form editor in Weblication® CMS Core Classic and Business!

Operation
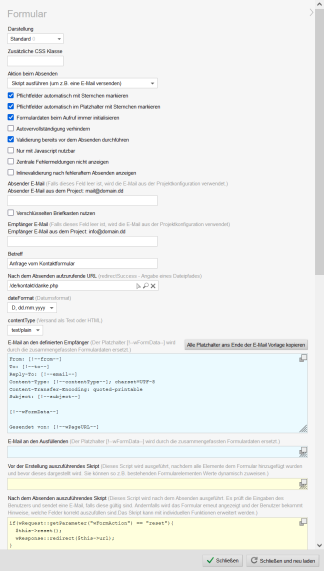
The module can be used to edit the form settings (display, script for action, recipient email, thank you page, email template, etc.) as well as the individual form fields via masks. The user should at least be instructed in how a form works (see further links below).
The most important settings and fields are described below using the example of a form from the BASE (Mobile First) project.
'Update symbol display':
By clicking on this button, the editor reloads the page with the form to display changes directly.
'Show advanced form settings icon':
Click on this button to show the advanced form settings.
In the advanced settings, you can create individual scripts for the behavior before and after sending the form, control the structure of the email and define the forwarding destinations after sending the form, among other things.
'Display':
Use this selection box to select the display type of the form fields. The standard display is already supplied and other display types can be installed later using CSS-only variants (e.g. for labels next to or in the input fields).
'Additional CSS class':
In this field, you can optionally enter a CSS class name that is set for the form (form tag) (e.g. myForm). You set this class in the corresponding CSS file (e.g. design.css) to define the CSS formats.
If the field is empty, no class is set and the generally defined formatting for the form tag applies.
'Action on submit':
Use this selection box to select the action that should be executed when the form is submitted, e.g:
- Execute script (e.g. to send an e-mail)
- Reload with parameters (e.g. to update filters)
- Call up the following URL with parameters
'Automatically mark mandatory fields with an asterisk':
If this parameter is activated, an asterisk (*) is automatically added to a form field description (label) if a form field has been defined as a mandatory field.
'Automatically mark mandatory fields in the placeholder with an asterisk':
If this parameter is activated, an asterisk (*) is automatically set after the text for a form placeholder m field, provided that a form field has been defined as a mandatory field.
'Always initialize form data when called':
If this parameter is activated, the form data is initialized when the form is called up (again). The fields are either filled with defined initial values or emptied.
'Prevent autocomplete':
If this parameter is activated, autocomplete is switched off for the form.
'Perform validation before sending':
If this parameter is activated, an inline validation is performed for the form fields. This means that the validation takes effect when a field is left (marked with a green tick or red color).
'Only usable with Javascript':
If this parameter is activated, site visitors can only use the form if JavaScript is allowed in the browser.
'Do not display central error messages':
If this parameter is activated, no central message box with the error messages is displayed above the form when the form is submitted. Only the inline validation shows incorrect information.
'Show inline validation after incorrect submission':
If this parameter is activated, the inline validation is also displayed after sending with errors.
'Secure via form token':
If this parameter is activated, the form is secured via a form token to counteract potential attackers and spam.
'Save mail data in CSV file':
If this parameter is activated, the e-mail data of the form is logged in a CSV file. The file path to the CSV file can optionally be entered in the field. This must be within the DocRoot of the domain.
If no entry is made in the field, the CSV file is created in a /csv subdirectory of the form page. The CSV file is named with the file path called up (e.g. de_kontakt_index.csv).
An existing CSV file is added when the form data is written. If the structure changes, e.g. due to additional, deleted or renamed form fields, the previous CSV file is versioned and a new one is created.
For smooth functioning, both the CMS version and the form Weblic® and form script in the form must be up to date (see e.g. master template element).
'Sender e-mail':
In this field, enter a valid e-mail address that is to be used as the sender e-mail (From) when sending the form.
In BASE, forms are delivered in such a way that they use the default e-mail stored in the project configuration as the sender e-mail if the field is empty. This is then displayed below the field.
'Use encrypted mailbox':
If this parameter is activated, the form is also used as an encrypted mailbox and a selection box appears below the checkbox, which can be used to select the user who is to be used as the recipient for this.
This option is only displayed if the license has a number of encrypted mailboxes.
'Recipient e-mail':
In this field, enter a valid e-mail address that is to be used as the recipient e-mail (To) when sending the form.
In BASE, forms are delivered in such a way that they use the default e-mail stored in the project configuration as the recipient e-mail if the field is empty. This is then displayed below the field.
'Subject':
Enter the subject of the email to be sent in this field. If the field is not filled in, a standard text is used for the subject.
'URL to be called up after sending (redirectSuccess)':
In this field, enter the path to the page that should be called up after the form has been successfully submitted (e.g. /en/contact/thanks.php).
In BASE, forms are delivered in such a way that they redirect to the form page itself if the field is empty.
'dateFormat':
In this field you select the date format to be used for the calendar element (date selection).
'contentType':
Use this selection box to select the type of email to be sent (text or HTML). Text (text/plain) is used by default.
'Email to the defined recipient':
This field is used to define the email header and content (body) for the email to the recipient of the contact form.
Placeholders can be used to read the values entered in the form into the email. The name of a form field (e.g. firstname) is specified as a placeholder, e.g. [!--firstname--] (case-sensitive).
By default, the form is delivered with [!--wFormData--] as a general placeholder, which automatically reads in all existing form fields for the e-mail.
If the content of the text e-mail is to be customized, use the button"Copy all placeholders to the end
of the e-mail template", which copies all placeholders of the existing form fields to the end of the template with a click. You can then arrange these more individually, e.g. using spacing, etc. Then remove the general placeholder [!--wFormData--], otherwise the fields will be read in twice.
Please bear in mind that if you change the form fields, the template must also be adapted because of the placeholders.
Another option is to use an HTML e-mail instead of a text e-mail. Set this for the contentType (see above) accordingly for HTML e-mails.
With text e-mails, the formatting is only correct if the recipient uses a non-proportional font in their e-mail program, such as Courier, as otherwise the spacing will be different.
General placeholders:
- [!--wPageURL--]
Specifies the URL of the requested form page, e.g.:
https://www.domain.dd/de/kontakt/index.php - [!--wPageHost--]
Specifies the host of the form page called up, e.g.:
www.domain.dd - [!--wDomain--]
Specifies the domain and HTTP protocol of the requested form page (from CMS version 016.003.123.000), e.g.:
https://www.domain.dd
'Email to the person completing the form':
This field is used to define the email header and content (body) for the email to the person completing the contact form.
The values entered in the form can be read into the email using placeholders.
If the content of the email is to be formatted, set the contentType (see above) to HTML emails.
For text emails, the formatting is only correct if the recipient uses a non-proportional font in their email program, such as Courier, as otherwise the spacing will be different.
'Script to be executed before creation':
This field defines the script that is executed before the form is generated.
This script is executed after all elements have been added to the form and before it is displayed. This allows you to dynamically assign values to existing form elements, for example.
'Script to be executed after submitting':
This field defines the script that is executed after the form is submitted.
It checks the user's entries and sends an email if they are valid. Otherwise, the form is displayed again and the user receives instructions on which fields must be filled in correctly. The script can be extended with individual functions.
'Form fields':
Below the form settings, you define the desired form fields for the respective request form.You can use the structure editor to edit/delete the existing form elements and add further elements to the page.
The form elements on the page can also be moved within the page editor.
Please note
- In Weblication®CORE Classic and Business without the add-on module, ONE form in the project can be edited with the form editor via the user interface.
The prerequisite for this is that the form is stored under the following path:
/[yourcontentproject]/contact/index.php (alternatively also possible as contact)
To edit any number of additional forms, you need Weblication® CMS CORE Professional, CMS GRID or the add-on module Form Editor. The module is included free of charge from Weblication® CORE CMS Professional and Weblication® GRID CMS.
Without the form editor module, additional forms do not offer the option of inserting, moving or deleting form fields within the form. - The structure editor is included as standard in Weblication® CMS CORE Business and can be activated as an optional module in the CORE Classic version.
- The structure editor is only displayed to a maintenance user if this has been assigned to them via 'User administration - Authorizations'.