

System settings - Mail server
In the 'Mail server' tab of the system settings, various general settings can be made for sending emails that apply across all projects.
These settings are used, for example, when sending e-mails via Weblication® forms and the wMailer framework functions or for newsletters.
By default, Weblication® always sends emails via Weblication®'s own functions. From CMS version 12.x, use the new wSMTP2 mail engine, which is already set for new installations from around mid-2017. For existing installations, you may need to manually switch to engineType="wSMTP2" in the Weblication® configuration.
If an SMTP host is specified in the system settings, sending is not carried out directly, but transferred to the set SMTP server.
Before filling in the fields, clarify with your provider what can be used for e-mail traffic via PHP scripts on the web server. If no data is entered, Weblication® CMS will fall back on its own mail functions.
Settings for various providers:
Examples for various providers can be found further down on this page.
After making changes to the settings, firsttest the mail function using the "Send test e-mail" button! You should also check all e-mail forms and mail scripts for functionality.
When using an SMTP host with authentication,remember that changed mailbox data at the provider must also be adjusted in the system settings.
If different mail servers are required in an installation, e.g. for different projects, this can be defined manually via the respective framework function for the script (e.g. contact form) (see framework function wMailer::sendMailStr).
The most important aspects of this topic can be found in the developer article Sending emails via forms and scripts. Read this article carefully in order to be able to use and guarantee the best possible mail functions on your website!
Operation
'Store in outbox before sending':
If this parameter is activated, emails remain in the outbox until they have been sent. If sending cannot be carried out, several attempts are possible.
'Number of sending attempts':
In this field, you can select the number of sending attempts (1, 2 or 3).
'Store in "Sent" directory after sending':
If this parameter is activated, emails are filed in the "Sent" directory after sending. The directory can be accessed via a separate tab in the outbox.
'Encrypt sent emails':
If this parameter is activated, emails are encrypted when they are sent and stored encrypted with the password defined for this purpose.
Make a note of the password, as this is the only way to access the encrypted emails.
'Delete sent after':
If this parameter is activated, sent emails are deleted as selected.
The following values are available for selection:
- never
- 1 day
- 2 days
- 3 days
- 1 week
- 1 month
- 3 months
- 6 months
'File in "Failed" directory after X failed attempts':
If this parameter is activated, emails are filed in the "Failed" directory after the number of failed attempts. The directory can be accessed via a separate tab in the outbox.
'Delete failed after':
If this parameter is activated, failed emails are deleted as selected.
The following values are available for selection:
- never
- 1 day
- 2 days
- 3 days
- 1 week
- 1 month
- 3 months
- 6 months
'Outbox button':
Clicking on this button opens the mask for the outbox.
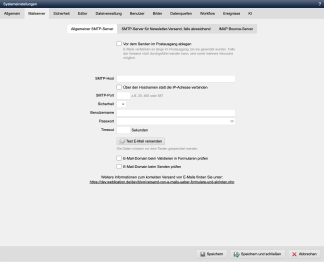
'SMTP host':
In this field you can optionally enter an SMTP host (e.g. smtp.domain.dd).
Most SMTP hosts only work via authentication, which is why a user name and password of an authenticated account must be entered in the following fields.
If no SMTP server is entered, emails sent via Weblication® functions are transferred to PHP Sendmail and sent. The use of PHP Sendmail can also be enforced by the following entry in the field: sendmail()
This alternative option to an SMTP server is available if other options cannot be used. It must then be ensured that Sendmail is functional under PHP. You should also bear in mind that when using PHP sendmail, the return-path specification always uses the same value globally from the PHP settings for the entire installation.
Please also note that this setting is not covered by Weblication® support.
You should also note that, depending on the provider, the outdated encryption protocol TLSv1 (TLS 1.0 or TLS 1.1) is still used under PHP Sendmail (e.g. under 32bit systems with Domainfactory).
'Connect via the host name instead of the IP address':
If this parameter is activated, the specified SMTP host is addressed directly via the name and not via the IP address, which is resolved to the host name. This is necessary depending on the SMTP server used and should be checked on a case-by-case basis. It is best to use the"Send test e-mail" button for checking, which shows how and whether sending can take place.
This setting is only available if the wSMTP2 engine is activated.
'SMTP port':
In this field you can optionally enter an SMTP port (e.g. 25 or 465 or 587 for a secure connection).
'Security':
In this field, you can optionally select the type of encryption if an SMTP host is used for secure connections ( e.g. SSL or STARTTLS).
'User name':
In this field you enter a valid user name of an e-mail account when using an authenticated SMTP host.
This must be a valid account (usually Pop3 or IMAP). OWA accounts etc. are not supported!
'Password':
When using an authenticated SMTP host, enter a valid password for the previously entered user name (account) in this field.
'Timeout':
In this field, you can optionally enter a timeout in seconds. When sending emails, the duration of the connection to the mail server is limited to this time period.
'Send test email':
Click on this button to send a test e-mail to the e-mail address stored for the current user. The settings of the 'General SMTP server' are used for sending.
After a short time, a Weblication® message should appear with the following query:
"Now check whether you have received the test e-mail. Ihre@Mail-Adresse.tld".
After successful sending, a test e-mail with the subject"E-Mail Test" should have been sent to the e-mail address of the current user. The'Sender address of system e-mails' stored in the system settings is set as the sender.
'Check email domain when validating in forms':
If this parameter is activated, the entered email address is checked for a valid domain when validating a form field (type: email).
The PHP function checkdnsrr is used for the check, which must be available on the server and correctly integrated.
'Check e-mail domain when sending':
If this parameter is activated, the system checks whether the sender and recipient email addresses use a valid domain when sending emails, e.g. from forms.
The PHP function checkdnsrr is used for the check, which must be available on the server and correctly integrated.
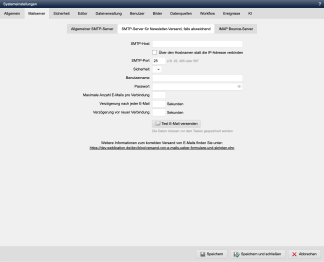
'SMTP server for newsletter, if different':
In the following fields, you can specify a different SMTP server separately for sending newsletter emails. The newsletter must be sent via an SMTP server.
'SMTP host':
In this field you can optionally enter an SMTP host (e.g. smtp.domain.dd).
Most SMTP hosts only work via authentication, which is why a user name and password of an authenticated account must be entered in the following fields.
From CMS version 012.006.105.000, the use of PHP Sendmail can be enforced by making the following entry in the field: sendmail()
This alternative option to an SMTP server is available if other options cannot be used. It must then be ensured that Sendmail is functional under PHP. Please also note that this setting is not covered by Weblication® support.
'Connect via the host name instead of the IP address':
If this parameter is activated, the specified SMTP host is addressed directly via the name and not via the IP address, which is resolved to the host name. This is necessary depending on the SMTP server used and should be checked on a case-by-case basis. It is best to use the"Send test e-mail" button for checking, which shows how and whether sending can take place.
This setting is only available if the wSMTP2 engine is activated.
'SMTP port':
In this field you can optionally enter an SMTP port (e.g. 25 or 465 or 587 for a secure connection).
'Security':
In this field, you can optionally select the type of encryption if an SMTP host is used for secure connections ( e.g. SSL or STARTTLS).
'User name':
In this field you enter a valid user name of an e-mail account when using an authenticated SMTP host.
This must be a valid account (usually Pop3 or IMAP). OWA accounts etc. are not supported!
'Password':
When using an authenticated SMTP host, enter a valid password for the previously entered user name (account) in this field.
'Timeout':
In this field, you can optionally enter a timeout in seconds. When sending emails, the duration of the connection to the mail server is limited to this time period.
'Maximum number of emails per connection':
In this field, you can optionally specify how many emails should be sent per connection to the SMTP server.
Ask the operator of the SMTP server for the limits to the mail server in order to find the optimum setting for sending newsletters (see also developer article).
'Delay after each email (in seconds)':
In this field, you can optionally specify the delay in seconds after each email when sending newsletters (e.g. 0.5 for half a second or 2 for two seconds).
The setting also enables the use of mail servers with a corresponding limit (e.g. to 40 emails per minute).
'Delay before new connection (in seconds)':
In this field, you can optionally specify the delay in seconds before a new connection (e.g. 300 for 5 minutes).
The setting thus specifies how long to wait after the maximum number of emails to be sent (see setting above) have been processed or a timeout has been reached until the next sending is to be started.
'Send test e-mail':
Click on this button to send a test e-mail to the e-mail address stored for the current user. The settings of the 'General SMTP server' are used for sending.
After a short time, a Weblication® message should appear with the following query:
"Now check whether you have received the test e-mail. Ihre@Mail-Adresse.tld".
After successful dispatch, a test e-mail with the subject " E-mail test " should have been sent to the e-mail address of the current user. The ' Sender address of system e-mails ' stored in the system settings is set as the sender.
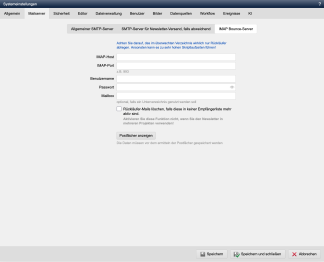
When using the Weblication® Newsletter Module, you can store data for undeliverable e-mails (bounces) on an IMAP bounce server.
Newsletter e-mails which have defined an e-mail returnPath specification via the config.xml, which is set in the e-mail header when they are sent, are sent to this address if they cannot be delivered.
Make sure that the monitored directory really only contains returns. Otherwise this can lead to very long script runtimes!
IMAP host':
If you are using an IMAP bounce server, enter the IMAP host in this field (e.g. imap.domain.dd). Enter the corresponding port, user name and password for the e-mail mailbox below.
'IMAP port':
In this field, enter the IMAP port that matches the IMAP host (e.g. 993).
'User name':
Enter the user name of an e-mail account in this field. As a rule, this is the e-mail address of the mailbox (e.g. bounce@domain.dd).
'Password':
Enter the password for the previously entered user name (account) in this field.
'Mailbox':
In this field you optionally enter the name of the mailbox. This is only necessary if you use a subdirectory of a mailbox for the bounce emails.
'Delete bounce mails if they are no longer active in any recipient list':
If this parameter is activated, the email recipients are deleted from the recipient lists if there are bounce emails for this and the addresses are no longer active.
'Show mailboxes':
By clicking on this button, the folders for the entered IMAP mailbox are displayed in a new window.